Complete Guide to Installing a Ceiling Light

Safety is the primary concern when working with any type of electrical wiring, so before starting any project be sure to turn off the power at the breaker box. This guide will show you how to install a ceiling light, including all the necessary tools and supplies.
What You Need To Know About Hanging A Ceiling Light Fixture
Tools and Materials:
– Phillips screwdriver
– Non-contact voltage tester
– Wire strippers
– Electrical tape
– Needlenose pliers
– Cable ripper (optional)
– Recessed light trim kit (if necessary)
– Light bulb(s)
1. Select a Location for the Fixture
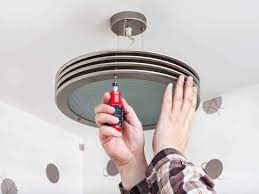
The first thing you need to do is find a suitable location for the ceiling light. It’s important to make sure that the area is free of any obstacles, and that there is enough space for the fixture itself. Once you have found a spot, use a Phillips screwdriver to remove the existing light fixture (if there is one).
2. Disconnect the Wiring
Next, you need to disconnect the wiring from the old fixture. Be sure to use a non-contact voltage tester to make sure that the power is off before proceeding. Once you have confirmed that the power is off, use wire strippers to remove about ½ inch of insulation from the end of each wire.
3. Connect the Wiring to the New Fixture
Now it’s time to connect the wiring to the new ceiling light fixture. First, twist each of the exposed wires together, then use electrical tape to secure them. If your new fixture has a ground wire, be sure to twist it together with the green ground wire from the house wiring.
4. Hang the Fixture
Once the wires are all connected, you can now hang the new ceiling light fixture. Start by holding the fixture up to the electrical box, then use needlenose pliers to twist the retaining screws onto the mounting bracket. Finally, screw in the light bulb(s) and restore power to the circuit.
5. Test the Fixture
Once power has been restored, test the new ceiling light fixture to make sure it is working properly. If everything looks good, you can now enjoy your new light!
How Much Does it Cost to Install a Ceiling Light Without Existing Wiring
If you need to install a ceiling light but don’t have existing wiring, the cost can range from $100 to $200 depending on the type of fixture and whether or not you need to add new wiring. If you are comfortable doing electrical work, you may be able to save money by doing it yourself. However, if you are not confident in your ability to safely install the ceiling light, it is always best to hire a professional.
Hanging a ceiling light fixture is a relatively easy task that most homeowners can do themselves. However, safety is always the number one concern when working with electrical wiring, so if you are unsure of how to properly install a ceiling light, it is always best to hire a professional.
Things You Should Know When Installing Your Own Lighting Fixtures
1. Always turn off the power at the breaker box before starting any project that involves electrical wiring.
2. Use a non-contact voltage tester to make sure that the power is off before proceeding.
3. Use wire strippers to remove about ½ inch of insulation from the end of each wire.
4. Twist each of the exposed wires together, then use electrical tape to secure them.
5. If your new fixture has a ground wire, be sure to twist it together with the green ground wire from the house wiring.
6. Start by holding the fixture up to the electrical box, then use needlenose pliers to twist the retaining screws onto the mounting bracket.
7. Finally, screw in the light bulb(s) and restore power to the circuit.
8. Once power has been restored, test the new ceiling light fixture to make sure it is working properly.

 How to Plan and Budget for Major Home Renovation
  Repairs to Make Before Selling Your Home
  5 Reasons to Upgrade Your HVAC System Before Winter