
How do you use the Heat Pump Commissioning Checklist for Mild Winter Climates?

The mild winter conditions place heat pumps in a special operating environment where shoulder-season performance becomes more important than low-temperature capability. The equipment may cycle frequently as outside temperatures range from cool mornings to warm afternoons, and the owners may switch between heating and cooling modes in the same week. Commissioning is the process of verifying that the heat pump is properly connected, charged, and designed to operate well under these conditions without frequent lockouts, comfort issues, or humidity complaints. A structured checklist also prevents problems with the thermostat, defrosting, and backup heat operating when it is not needed. When commissioning is completed properly, the system will provide consistent temperatures in the building, minimize noise during short cycles, and protect the compressor. The objective is to provide predictable system performance across various weather conditions, with settings reflecting the building, equipment, and local utility costs.
Commissioning Steps That Matter
- System Identification and Wiring Verification
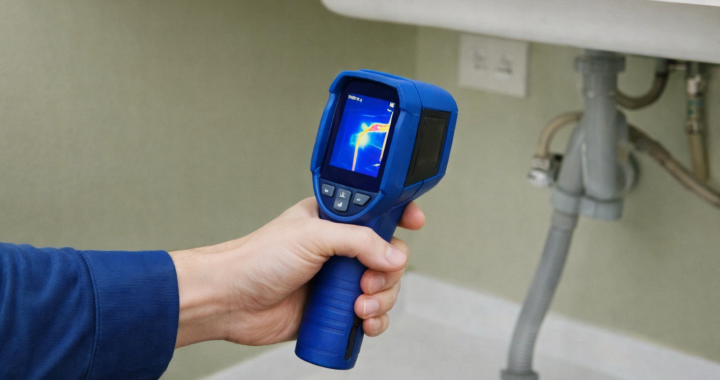
Begin by confirming what you are commissioning, since mixed equipment combinations and replacement parts can create confusion later. Record the outdoor unit model, indoor unit model, coil match, refrigerant type, and power requirements. Verify the thermostat type and whether the system is conventional 24-volt control or communicating. Next, confirm wiring at the indoor control board and at the thermostat terminals. Heat pumps require the correct reversing valve control, typically O or B; an incorrect configuration can cause heating to run in cooling mode or vice versa. Confirm Y for compressor call, G for indoor fan, and any auxiliary heat wiring if present. For dual fuel setups, verify furnace integration and lockouts. In mild winter climates, a minor wiring error can remain hidden until a temperature swing triggers an unusual call sequence, so it is worth testing each mode directly. If you are working with a local provider such as Heating and Cooling Services in Las Vegas, NV, having a written wiring map and photos of board terminals can speed future troubleshooting and reduce repeat visits. Also, check that line voltage disconnects and breakers are correctly sized and labeled, and that grounding is intact.
- Airflow Setup and Static Pressure Checks
Airflow affects a heat pump by stabilizing heat transfer, which in turn affects the coil and refrigerant temperatures and pressures. Make sure the return and supply lines aren’t blocked, the filter is the right size for the system, and the evaporator coil is clean before you address refrigerant charge problems. You should measure the total external static pressure at the air handler or furnace and compare it to the acceptable range specified in the equipment literature. High static pressure can reduce airflow efficiency, increase noise levels, and make it more likely that coils will freeze during cooling or that trips will be limited during heating. In a temperate environment, systems may run at low stages more often. The airflow at the lower stages must still be sufficient to keep the coil within a safe operating range. If the blower can change speeds, look at how the air flows when the fan is on for heating, cooling, and constant operation. Make sure that closing the bedroom doors doesn’t cut off the return air. Transfer paths, such as jump ducts or transfer grilles, can help maintain steady pressure and reduce complaints about comfort. Check the airflow first, then check the temperature rise during heating and the drop during cooling to confirm the airflow is as expected.
- Refrigerant Charge and Line Set Validation
Charging must be done as the manufacturer specifies, and the method depends on the metering device and the mode of operation. Make sure that the length and diameter of the line set are correct and that the insulation is on the suction line. Look for oil at flare or braze joints, which may indicate a leak. Make sure the outdoor unit has the right factory charge for a standard line set, and if the line is longer than normal, make the necessary adjustments. In most systems, the cooling-mode charge verification involves subcooling for TXV systems or superheat for fixed-orifice systems. Still, there is also a need for a heating-mode perspective in heat pump commissioning because the reversing valve alters the refrigerant flow path. Record indoor and outdoor temperatures, suction and liquid pressures, and determine target values from manufacturer data. Mild winter climates can make it difficult to decide on the heating mode charging because outdoor temperatures may not be sufficiently low to represent a true winter load. Use the most stable conditions available and follow the recommended procedure. Make sure service valves are fully open, caps are tightened, and a final leak check is performed.
- Thermostat Configuration for Mild Weather
The thermostat’s setup can make or break a mild climate. Verify that the thermostat is set up correctly for the type of equipment, including a heat pump with or without auxiliary heat. Set up the reversing valve logic properly. Set up compressor protection options, such as minimum off-time, to avoid short cycling when temperatures change rapidly. Set up staging so that the system uses the low stage first and only ramps up after a reasonable delay. If secondary heat is available, program balance points and lockout temperatures to allow secondary heat operation only when necessary or when comfort is required. If the residence is humid under mild conditions, enable dehumidification strategies and slightly reduce airflow during cooling to prevent coil freeze. Check the schedule programming to promote steady setpoints during nighttime hours rather than large setbacks that cause quick recovery. Additionally, check if outdoor temperature sensors are working properly, as lockout points and staging actions could be affected by them.
A heat pump commissioning checklist for a mild winter climate should include verifying that the heat pump operates effectively even when temperatures fluctuate and when it is cold. The first step is to identify the system and check the wiring properly. Then, static pressure measurements and blower setup are used to verify airflow and ensure the coil can safely transfer heat. The process also includes checking the refrigerant charge according to the manufacturer’s instructions, taking into account the line set details, and maintaining stable test conditions. Setting up the thermostat according to heat pump logic, staging, and compressor protection to reduce short cycling is also part of the process. This includes finding balance points and lockout points to prevent backup heat from running continuously. At the end of the process, performance is checked and documented, including taking readings and settings and providing the homeowner with information on how to make seasonal changes.
 Stopping the Leak: How Hidden Plumbing Problems Drain Your Bank Account
  How Modern Residential Plumbing Solutions Reduce Long-Term Repair Costs
  A Homeowner’s Guide to HVAC Maintenance for Unpredictable Weather